 This application note explains how to measure the wall thickness of commercial glass products, such as bottles, containers, tubing, sheets and plates, scientific glassware, bulbs, and lamps, as well as the thickness of glass coatings on glass-lined tanks. Discover the recommended glass thickness gauges and procedures to measure glass materials. Background on Measuring Glass ThicknessGlass is an inexpensive and highly versatile engineering material that can be cast, molded, or blown into a wide variety of shapes. It is highly transmissive to high-frequency sound waves, making it an excellent material for ultrasonic thickness gauging. Glass is also nonmagnetic, making it measurable with Hall-effect thickness gauges (also known as magnetic gauges). The geometry of most common glass products makes mechanical thickness measurement with calipers or micrometers difficult or impossible. However, virtually all common glass products can easily be measured with ultrasonic or magnetic thickness gauges. Testing with these glass thickness gauges does not damage the glass, and thickness measurements are instant, accurate, and reliable. Equipment Used to Measure Glass ThicknessGlass thickness gauges include magnetic and ultrasonic thickness gauging equipment. Here is an overview of these glass thickness measurement tools: 1. Magnetic gauges
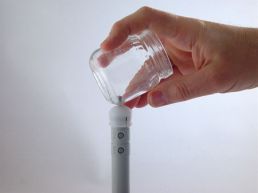
The Magna-Mike™ 8600 Hall-effect thickness gauge is an excellent instrument for glass measurement in applications involving bottles, containers, and tubing with an open end that permits insertion of a target ball, and a thickness not exceeding approximately 25 mm (1 in.)
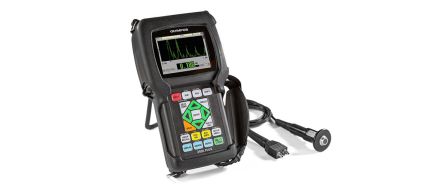
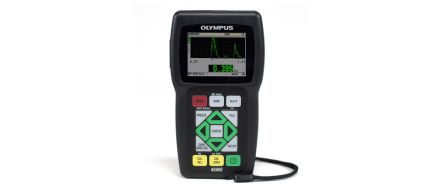
2. Ultrasonic gaugesPrecision ultrasonic thickness gauges such as the 39DL PLUS™ gauge and 45MG gauge with Single Element software can be used to measure typical glass products over a thickness range from approximately 0.125 mm (0.005 in.) to 500 mm (20 in.) As with any thickness gauging application, the ultrasonic gauge measures the round-trip travel time of a high-frequency sound pulse in the wall of that test piece, then uses that measured pulse transit time and a calibrated material sound velocity to calculate wall thickness. Ultrasonic gauges can be used to measure all common glass products. They are particularly useful in situations where glass thickness exceeds the range of the Magna-Mike 8600 Hall-effect thickness gauge, where part geometry prevents insertion of a target ball (as in the case of sealed bulbs), and where very high levels of accuracy are required (approaching +/- 0.002 mm or 0.0001 in.) Precision thickness gauges such as the 39DL PLUS gauge and 45MG gauge with Single Element software are pre-programmed with default transducer setups that can be used for most common glass setups. They require only velocity and zero calibration as described in the instrument operating manuals. In a few specialized cases involving complex geometries or other challenging conditions, a custom transducer setup may be required. An example is in situations where a focused immersion approach is recommended due to sharp radiuses. In those applications, Evident will provide setup assistance. 7 Common Glass Thickness Measurement ApplicationsGlass thickness gauges are used to measure a wide range of glass products. The following list shares the most common glass measurement applications and the recommended equipment for each one. 1. Bottles and containersThe Magna-Mike 8600 Hall-effect thickness gauge is commonly used for glass bottle and container measurement. However, ultrasonic gauges used with small diameter contact transducers such as the M116 (20 MHz) also work well. Measurement is quick, simple, and completely nondestructive. 2. Glass tubingMost short sections of glass tubing can be easily measured with the Magna-Mike 8600 Hall-effect thickness gauge. Tubing can also be measured ultrasonically using a small diameter contact transducer such as the M116 (20 MHz). For very small diameter tubing (diameter less than about 6.25 mm or 0.25 in.), focused immersion transducers such as the M316-SU F-.75 (20 MHz) are generally recommended to optimize sound coupling. These transducers will typically be used with a B-103 bubbler to maintain tubing orientation with respect to the sound beam. 3. Sheets and platesWhile thinner sheets and plates (under 10 mm or 0.400 in.) can easily be measured with the Magna-Mike 8600 Hall-effect thickness gauge, thicker glass plates are measured ultrasonically. This ultrasonic test can be done using the 39DL PLUS gauge or 45MG gauge with Single Element software and contact transducers such as M109 (5 MHz) and M106 (2.25 MHz). 4. Scientific glasswareWhen part shape permits insertion of a target ball, scientific glassware can be easily measured with the Magna-Mike 8600 Hall-effect thickness gauge. Sealed bulbs and complex shapes that do not permit use of a target ball can normally be measured ultrasonically with precision thickness gauges. For very small diameter tubing (diameter less than approximately 6.25 mm or 0.25 in.) or small spheres (diameter less than 25 mm or 1 in.), focused immersion transducers such as the M316-SU F-.75 (20 MHz) are generally recommended to optimize sound coupling. These transducers are typically used with a bubbler to maintain part orientation with respect to the sound beam. 5. Bulbs and lampsThe thin walls of sealed glass bulbs and lamps can be measured with precision thickness gauges and an M208 delay line transducer (20 MHz). Some sharp radiuses may require use of focused immersion transducers with an appropriate bubbler. The same thickness gauge and transducer can also be used to measure the thickness of the plastic protective coatings that are sometimes applied to glass bulbs. 6. Glass coatingsGlass coatings, such as the protective liners of some chemical tanks, can usually be measured ultrasonically. This measurement is easiest if the test can be performed from the glass side. Often, glass liners can be measured through a steel wall if inside access is not available. In many cases, the 39DL PLUS gauge with the Multilayer Measurement software option can measure both the liner and tank thickness simultaneously. Transducer selection and instrument setup depend on the specific materials and thickness ranges involved; consult Evident for details. 7. Materials researchPhysical properties of glass such as elastic modulus, residual stress, hardness, and density can often be correlated to acoustic properties such as longitudinal and shear wave sound velocity. Evident offers a variety of ultrasonic instruments that can be used for materials research applications, including thickness gauges with velocimeter readout, flaw detectors, and pulser/receivers, as well as a complete range of contact, delay line, and immersion transducers. |
Measuring the Thickness of Glass Products and Coatings


The 39DL PLUS™ gauge is field-proven and reliable for virtually every ultrasonic thickness inspection. It works as a precision or corrosion thickness gauge to meet the challenges of demanding applications across industries, including maintenance, manufacturing, and energy production. With world-class ultrasonic capability, fast scanning speeds, and fully integrated wireless connectivity, this handheld gauge delivers results you can trust in a seamless workflow.

The 72DL PLUS™ advanced ultrasonic thickness gauge delivers precision thickness measurements at high speed in a portable, easy-to-use device. Compatible with single element transducers up to 125 MHz, this innovative instrument is ideally suited to measure the thickness of ultra-thin materials, including multilayer paint, coatings, and plastic. It can simultaneously display the thickness of up to 6 layers.

