Limitations of Phased Array Technology for Pipe Elbow Inspection
Phased array (PA) technology has been widely used in the last decade for corrosion inspection on pipelines and process piping. It offers such advantages as high-resolution data, high-quality imaging, and excellent coverage. Inspectors using phased array often experience an improvement in productivity since analyzing the results is relatively easy. High-quality imaging, including color-coded C-scans, helps decrease the impact that operator skill has on the results and increases the probability of detection. However, the large, rigid phased array probes available on the market are not well-suited for pipe elbow inspection. Large, rigid phased array probes cannot adapt to the changes in surface shape from concave on the intrados to convex on the extrados or cover the wide range of pipe diameters that need to be inspected. This has meant that ultrasonic inspection of pipe elbows was limited to using small-footprint conventional ultrasonic (UT) probes to perform manual spot checks. This process entails drawing a grid on the elbow and verifying it box-by-box. As well as being slow and tedious, this conventional UT method precludes inspectors from all the advantages that phased array technology offers.

The current inspection method for elbow corrosion mapping
Flow-Accelerated Corrosion (FAC) and Erosion-Corrosion
In power plants where there are pipelines that transport water or steam, the inner walls of these pipes are vulnerable to a specific type of corrosion. Because flowing water or steam inhibits the growth of a protective oxide layer, flow-accelerated corrosion (FAC) develops at a faster rate than corrosion in stagnant water. A similar effect is seen in the oil and gas industry.
Erosion-corrosion is wall thinning exacerbated by the stress produced by the flowing liquid in the pipe. FAC or erosion-corrosion can lead to failure if left unchecked. The sheer number of pipes to be tested means that inspectors require a method that optimizes the time and costs incurred in FAC and erosion-corrosion prevention. Using the conventional UT method to verify pipe elbows is impractical due to its inefficiency.
Solution Using the FlexoFORM™ Pipe Elbow Scanner
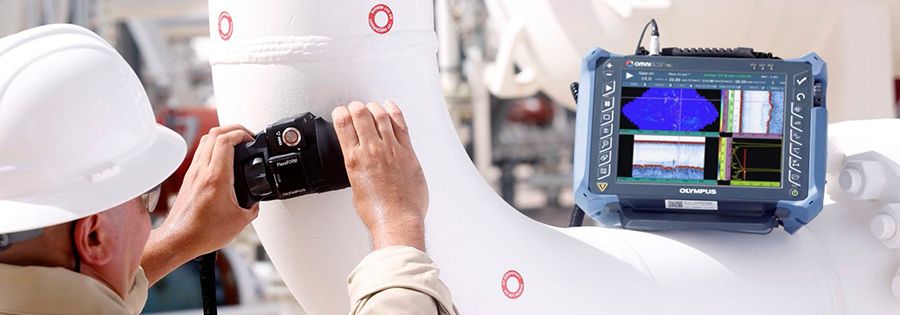
Olympus has developed a flexible ultrasonic phased array probe and scanner that provides high-resolution thickness mapping of the complete pipe elbow. With imaging, it is easier for inspectors to identify FAC and implement a targeted repair and/or maintenance strategy. The FlexoFORM phased array solution can be a useful tool in evaluating remaining operational life and helping to prolong the life of pipe elbows.
The FlexoFORM solution has three main components: a flexible phased array probe, local-immersion water wedges, and a scanner that provides stability and positioning information in relation to the part’s surface.
FlexoFORM Solution Components

FlexoFORM Phased Array Scanner Vs. Conventional UT
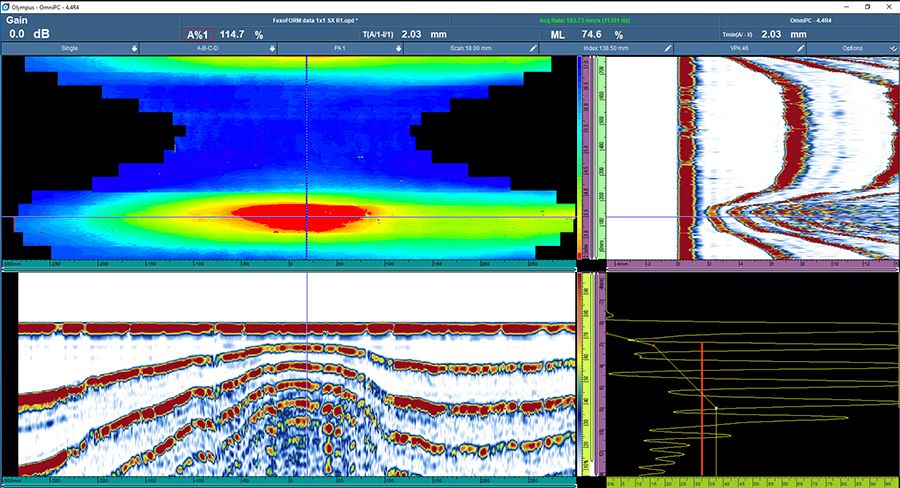
We performed an inspection on an 8.625 in. OD, 7 mm thick, carbon steel pipe elbow using the FlexoFORM scanner and an OmniScan® instrument. The flexible phased array probe provided a 1 × 1 mm resolution using a beam aperture of 3 elements. It only took 4 minutes to scan the entire elbow.
With the conventional UT method, the preparation is long, and the entire process, including inspection, can take up to 5 hours.
The time savings is significant, but the other advantage of this phased array solution is the imaging. The scan results show very severe wall loss. The different views (C-, B-, D-, and A-scans) clearly display the location of the erosion and its progression. The minimum measured thickness is close to 2 mm, which demonstrates the excellent near-surface resolution that can be achieved with this solution.
Summary of the Advantages Provided by the FlexoFORM Scanner Solution
Using this phased array scanner solution, power generation and oil and gas inspectors can obtain high-resolution thickness mapping of pipe elbows. The FlexoFORM pipe elbow scanner enables quick and reliable diagnosis of wall thinning caused by flow-accelerated corrosion or erosion. The flexible ultrasonic phased array probe and local-immersion water wedges included with the FlexoFORM scanner solution resolve past issues with rigid phased array probes since they can adapt to a broad range of pipe diameters. The solution is cost-effective, easy to use, and can help inspectors make significant improvements in productivity.


