用于测量涂层的精密超声测厚
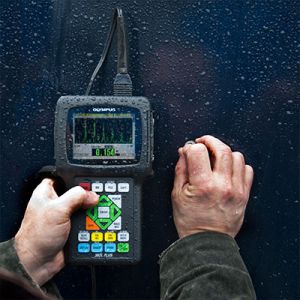
Paint, epoxy, and similar protective coatings on steel often present a potential issue in corrosion survey applications. Because the sound velocity of nonmetallic coatings is usually about half that of steel, a coating can add an error of double its actual thickness to a measurement. In this section, we will discuss the different measurement techniques Olympus ultrasonic thickness gauges use to measure the thickness of coatings.
Why Is It Important to Accurately Measure Coatings?
Coating thickness has a significant effect on product quality, process control, and cost control. Two factors help ensure a coating performs its intended function: the quality of the paint and the thickness of the coating. Accurately measuring a coating can guarantee that requirements are met across a range of industries. Ultrasonic gauges are nondestructive and can accurately take thickness measurements of coatings that require access of only one side of a material’s surface.
Ultrasonic Coating Thickness Measurement Techniques
Two techniques to measure the thickness of coated pipes and parts are echo-to-echo and THRU-COAT™ measurement. Each technique has strengths and weaknesses:
Echo-to-Echo Measurement:
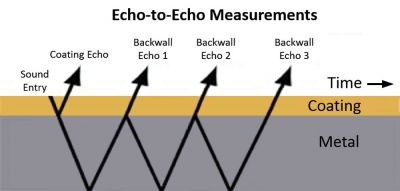
The echo-to-echo measurement technique, available on the 38DL PLUS™ and 45MG (optional) thickness gauges, enables you to measure the remaining wall thickness of pipes or other metal structures while removing the coating from the measurement. This technique times the interval between two successive back wall echoes to provide an accurate representation of the metal material’s thickness without the coating (as multiple back wall echoes can exist in metal but not commonly in coatings).
The advantages of using the echo-to-echo technique include:
- Works with a variety of common transducers
- Often works through rough-surfaced coatings
- Can be performed at high temperatures up to approximately 500 °C (930 °F) with the appropriate transducers
The limitations of the echo-to-echo technique include:
- Requires multiple back wall echoes, which might not exist in severely corroded metals
- Thickness range is sometimes more limited than with a THRU-COAT measurement
THRU-COAT Measurement:
The THRU-COAT measurement technique enables separate measurement of thin nonmetallic coatings like paint over metal and the metal thickness. This technique uses patented software to identify the time interval represented by one round trip in the coating. By subtracting this time interval from the total measurement, the metal substrate’s thickness can be calculated. THRU-COAT measurement may not work properly if the coating’s thickness is below 0.125 mm (0.005 in.) or if the external coated surface is rough or irregular. For more details on THRU-COAT measurement, see our guide on thickness gauge modes of measurement.
The advantages of using THRU-COAT technology over the echo-to-echo technique include:
- Works over a wide range of metal thicknesses, typically from 1 mm (0.04 in.) to greater than 50 mm (2 in.) in steel
- Requires only one back wall echo
- May measure minimum remaining metal thickness more accurately when there is pitting in the metal
Some of the disadvantages of using THRU-COAT technology are:
- Coating must be nonmetallic and at least 0.125 mm (0.005 in.) thick
- Coating surface must be relatively smooth
- Requires you to use one of two special transducers
- Can only be used on surfaces with a maximum temperature of 50 °C (125 °F)
For more information on how to use Olympus ultrasonic thickness gauges to measure remaining wall thickness through coatings, view our product video tutorials in our Resources.

