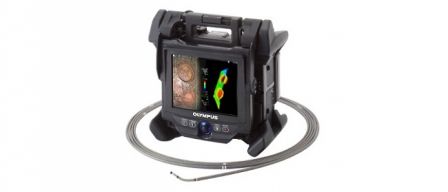
Videoscopes for remote visual inspection have traditionally faced the challenge of fitting complex optical and digital imaging equipment into the compact tip of the scope. As such, inspection and measurement capabilities have previously been limited, yet the latest innovations have now advanced videoscope technology to a new level.
Equipped with sophisticated manoeuvrability and usability alongside 3D stereo measurement over a 4x wider area, the next generation of videoscopes save time and increase efficiency, especially when inspecting larger defects in aerospace components. Probability of Detection and flaw characterisation are enhanced for extra confidence in decision-making, and real-world examples illustrate how accurate measurements are guaranteed under conditions where standard videoscopes fail.
At a Glance
· Characterising previously undetectable details ensures components are fit for purpose
· Latest videoscopes enhance inspection quality and probability of detection
· 4x wider area of 3D measurement increases speed and efficiency
· Hard-to-reach areas measured with tip-to-target range of 4-60 mm
· Case studies demonstrate accurate measurements where standard videoscopes fail
Revealing Hidden Flaws in Aerospace Equipment
Remote visual inspection (RVI) is a valuable tool when inspecting aerospace equipment, reducing cost and time through avoiding the need to disassemble complex components such as gas turbines, engine cylinders and fuel tanks.
As RVI technology has advanced, the latest generation of videoscopes are engineered with inspection quality and efficiency at the forefront. High quality optics combined with bright illumination aids quality, which combined with an intrinsic mechanical network allowing fine articulation and increased efficiency, vastly increases both usability and Probability of Detection (PoD). Building on these innovations, the introduction of new Super Wide Field 3D stereo measurement presents the next stage of videoscope evolution. Revealing and quantifying previously undetectable details in turn provides the confidence that every component is fit for performance, increasing up-time of aircraft and ensuring safe and secure air travel.
A more efficient way of working
The next generation of videoscope has incorporated a range of features to address every aspect of inspection, beginning with manoeuvrability. Fundamental to supporting comprehensive inspections with speed and efficiency, improving accessibility of hard-to-reach areas directly increases PoD. Navigating through tight spaces can now be achieved by the operator with a combination of increased flexibility and control, protected by unparalleled abrasion resistance afforded by a 42-strand tungsten mesh. C apitalising on these advances, the operator can easily direct the scope to visualise more of the component than previously possible, with direct sensitive control of articulation throughout the full 360° range.
In addition to improved usability, a breakthrough has also been achieved in operational efficiency by merging inspection and measurement capabilities into a true single operation – where historically the time-consuming flaw inspection workflow required two different tips to ensure accuracy. Once flaws were identified with a standard inspection tip, the scope was removed and the flaw re-analysed with a measurement tip in place. Single tips for inspection and measurement presented a major step forward in visual inspection, yet one of the drawbacks is that when used for standard inspection, these systems provide relatively dark poor-quality images. Contrary to popular belief, these do not offer a viable solution for observation, and in many cases poor image quality negates any other time saving benefits of these so-called single screen one tip solutions, where an inspector can often misinterpret a defect or miss the defect entirely.
Providing the best of both worlds in terms of observation quality and measurement capability, the latest videoscope with integrated 3D stereo measurement technology solves this problem. The new-to-market Olympus IPLEX NX features an upgraded CCD allowing for much greater resolution. Combined with a high-illuminance laser diode, super wide field of view (FoV) and advanced processing, this provides a bright, high-quality image. With more details visible, thorough inspections can be carried out at a wide angle with a single screen view, guaranteeing the highest performance for both inspection and measurement - with just a measurement tip installed.
Most importantly in the ongoing quest for efficiency, the 1.5x larger FoV and 1.7x larger Depth of Field (DoF) of the IPLEX NX finally allows for a 4x wider measurement area compared to conventional scopes (Figure 1), saving time and increasing efficiency by inspecting larger defects with a single image.
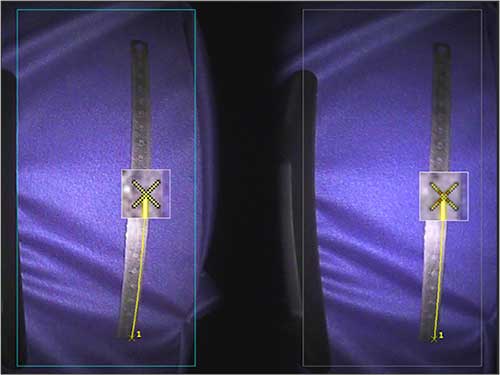 | Best Practice | Measuring from a target distance >200 mm
Achieving the best possible results with the IPLEX NX, a target distance of around 40 mm from the target object is recommended, compared to 20 mm required with standard videoscopes. In order to test measurement accuracy of the IPLEX NX videoscope against an extreme target distance and under adverse conditions, a measurement was conducted against a known distance of a calibrated rule of 100 mm (+/- 0.5 mm) length, from a target distance greater than 200 mm (192.8–204.8 mm). The surface of the rule was highly reflective, in order to place the system under the most adverse conditions possible and to understand the accuracy achievable in the worst case scenario. While a standard videoscope was unable to achieve any measurement data, the IPLEX NX achieved measurement with 99.79% accuracy. |
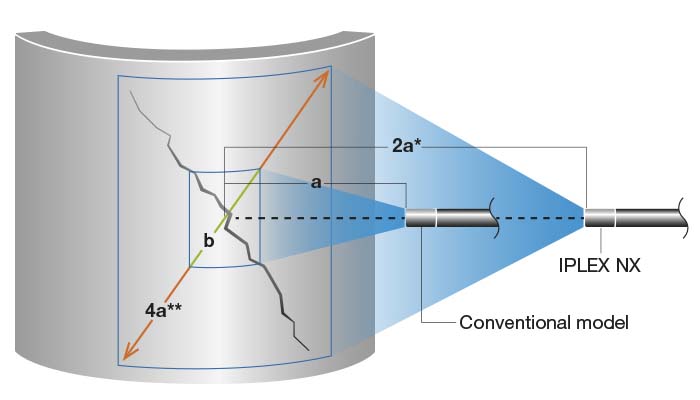
Figure 1 Fast and Efficient Inspection with a 4x Larger Measurement Area
Comprehensive investigations are enabled in less time with the 4x wider measurement area (4b), achieved with the 1.5x larger FoV and 1.7x larger DoF of the Olympus IPLEX NX. Compared to the limited views of standard videoscopes (b), defects in hard-to-reach areas can also be measured from a greater distance (a compared to 2a).
Increasing Probability of Detection
Advances in image quality not only support accurate measurements, but this has also led to an increase in PoD.
The 1.7x increase in DoF allows measurement across a tip-to-target range of 4-60 mm, which dramatically improves PoD compared to existing systems that are limited in measuring flaws from a greater distance. Such an increase in DoF means flaws can be observed in the most inaccessible areas such as heat exchanger tubes or turbine blades without the need to be close to the target object, as demonstrated by the following case study.
Advances in 3D Stereo Measurement
Alongside increased PoD, the accurate measurement of identified flaws is vital for aerospace inspection, providing detailed insights and therefore enabling fully informed decision making. Building on the latest optical and digital technologies, new super wide field 3D stereo measurement allows components to be inspected with unprecedented accuracy in less time than previously possible. This is built into videoscopes such as the IPLEX NX, which features new optics and high luminescence responsible for the 1.5x increase in FoV. In essence, this equates to the measurement area expanded by 4x, and allows the entire defect to be captured in one attempt, in real time. In addition to saving operators from the time-consuming task of acquiring multiple images and measurements, this is particularly ideal for characterising larger defects, from a greater target distance. A range of 3D measurement functions are possible using this technique, as sizing and situational information on the X, Y and Z planes is automatically captured after reference and/or measurement points are plotted (Figure 2). Measurements include the distance between two plotted points or reference line, area/circumference of multiple points and the depth or height between a point and reference plane.
Advances in processor technology and computational algorithms have also underpinned improvements in measurement performance, while introducing valuable new capabilities. For example, displaying data in real-time provides a wealth of information, keeping the operator informed of surface shape and distance with no pause or break in the inspection, for a fast and seamless workflow. Distance from the scope tip to multiple points on the inspection surface is provided with multi-spot ranging, and prior to capturing an image for measurement, its suitability is immediately assessed via pre-measurement surface condition and confidence information. This indicates if the target area can be measured prior to image capture, or if the image must be re-captured under different conditions. Unlike standard videoscopes lacking such an information feed, super wide field 3D stereo measurement displays the cause of error, enabling the user to avoid repeating the same mistake. Greater processing power also allows for maximising the level of information acquired from a single image through applying multiple measurement modes, with the IPLEX NX performing three types of measurement on the unit itself, and 10 on a compatible PC.
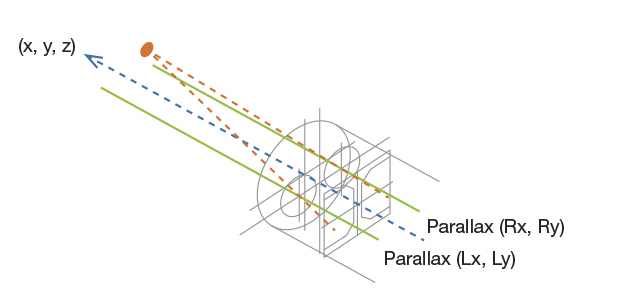
Figure 2 Quantifying Flaws with 3d Stereo Measurement
Measurements utilise triangulation and parallax, and acquiring information on X, Y and Z positions of a point is achieved with quality optics, CCD and processor. Perspective shift across each side of the CCD is determined, and an advanced algorithm enables multiple 3D measuring functions.
Accurate measurement under challenging conditions
As discussed, the next generation of videoscope delivers many benefits, and the following examples highlight these in challenging real-world situations.
1. Reflective Surfaces
A range of materials, including metals, glass and oily surfaces are highly reflective. Unfortunately, imaging these samples using a standard videoscope results in darks areas which cannot be measured. Therefore, measurement of the object’s width cannot be achieved. Under the same conditions, measurement is possible utilising super wide field 3D stereo measurement (figure 3).
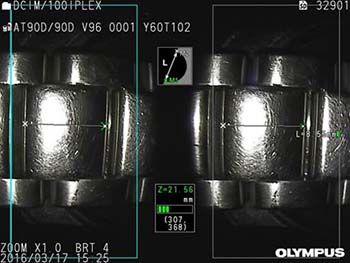 | Figure 3 Super wide field 3D stereo measurement of a reflective surface with the IPLEX NX. There are no dark areas meaning the whole object can be accurately measured. Measurement results: 10.6 mm and 10.1 mm for the scale of 10.0 mm |
2. Dark Objects
When an object is too dark, it is common for many videoscope systems to display the error message “Measurement Error. Please rotate the tip or move closer for better results”. Image capturing fails even though the objective is close, and therefore components such as large vessels, combustion chambers and high absorbency materials cannot be inspected accurately. However, the IPLEX NX super wide field 3D stereo measurement system achieves accurate results, even at greater distances which makes it possible to determine dimensions of of defects in darker environments (figure 4).
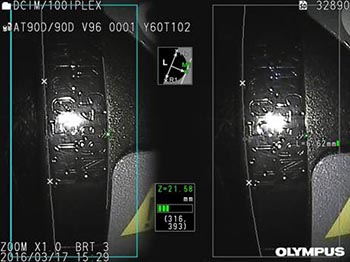 | Figure 4 Successful dark-object imaging with the IPLEX NX |
3. Angled Objects
Any object taken at an angle towards or away from the CCD can be challenging to measure. While the image looks fine, the actual measurable area is very small. Standard videoscopes often have inflexible LED illumination for the phase grating pattern projection, which is not adjustable to allow measurement. With super wide field 3D stereo measurement, results can be achieved under the same conditions, and the object is entirely illuminated by brightness control (figure 5).
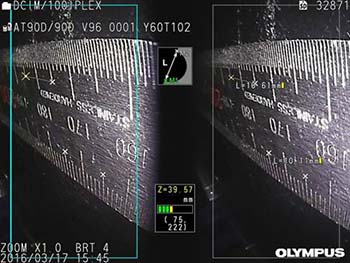 | Figure 5 Full illumination provided by the brightness control of IPLEX NX enables measurement of angled objects. Measurement results: 0.6mm and 10.1mm for the scale of 10.0mm |
4. Objects with a Small/Narrow Surface Area
Components such as gear teeth and front-end blade perspectives have small surface areas too narrow to project grating patterns, meaning that measurement of the target is not possible with standard videoscopes. Using the IPLEX NX with super wide field 3D stereo measurement, the component’s distal end can be accurately measured (figure 6).
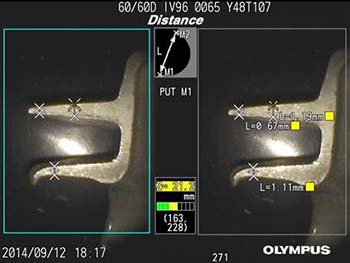 | Figure 6 Accurate measurement even at the narrow distal end of this component is made possible with the IPLEX NX’s super wide field 3D stereo measurement |
Summary
As key factors in improving productivity in aerospace maintenance, reduced inspection time and increased accuracy have been addressed with the next generation of RVI videoscope such as the Olympus IPLEX NX.
Integrated into this single-tip system, super wide field 3D stereo measurement presents a breakthrough in testing and inspection technology, dramatically increasing PoD and facilitating informed decision making. This is achieved through allowing operators to inspect areas 4x larger than previously possible, thanks to high quality optics and a wider field of view. In fact, this holds true even when access is severely limited, as increased depth of field enables accurate measurement with a tip-to-target distance of 4-60 mm. Through a constant display of real-time information and upgraded computational power, reliable measurements are easily achieved in a variety of test conditions, including low light and reflective surfaces. As has been demonstrated, the IPLEX NX can capture images during test conditions where standard videoscopes fail.
In summary, the latest 3D stereo measurement technology increases PoD through high-quality images, allowing operators to quickly uncover and accurately measure flaws that previously remained hidden – thoroughly inspecting components for ultimate confidence in aircraft performance.
Author Liam Hanna
Liam started by joining the Olympus Consumer Imaging Division as an Imaging Specialist and has transferred these skills to the Scientific Solutions Division over the last 5 years. As Product and Application Specialist for Remote Visual Inspection within the EMEA a dynamic approach is required in order to provide customers with the best possible solution. With a strong customer focus, Liam has spent many years traveling throughout Europe, The Middle East, Africa, Russia and Asia to work closely with Olympus stakeholders, namely global organizations, distributors and end users for support or acquisition, learning from them in order to help develop market driven products for the future.
Contact information
Liam G. Hanna
Liam.hanna@olympus-europa.com
Product Specialist RVI
VM Maintenance
Scientific Solutions Division
OLYMPUS EUROPA SE & CO. KG
Wendenstraße 14-18, 20097 Hamburg, Germany

