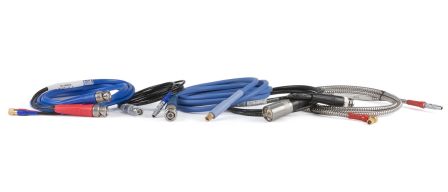
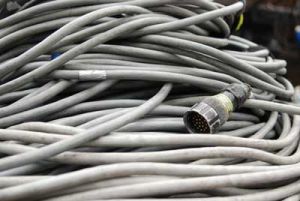
 A transducer cable is an integral part of any ultrasonic flaw detection or thickness gauging system, but usually it is not the subject of much operator attention other than confirming that it is not broken, frayed, or otherwise defective. Most ultrasonic tests are performed in the conventional frequency range from 500 KHz to 20 MHz, with transducer cables whose length does not exceed
approximately 2 meters or 6 feet. However, in applications involving higher test frequencies or longer cables, it is important to be aware of the potential effects of increasing cable length and adjust for them as necessary.
This application note discusses the use of very long cables with transducers at test frequencies of approximately 20 MHz and below. The special cable issues relating to very high-frequency transducers (50 MHz and higher) are discussed in the white paper, Application Considerations in Specifying High-Frequency Ultrasonic Transducers.
Factors to Consider as Cable Length Increases
There are four factors that must be considered: cable reflections, cable attenuation, cable delay, and cable noise pickup. All of them become increasingly important as cable length increases, especially with cables longer than approximately 20 meters or 65 feet.
Cable Reflection
In any ultrasonic system, an excitation pulse or "main bang" travels from the instrument's pulser to the transducer at a speed that in a typical coaxial cable approaches the speed of light. When that excitation pulse reaches the transducer, much of the electrical energy is converted into sound waves. However, some of the electrical energy is reflected back to the pulser. When it reaches the pulser, a portion of that energy reflects back towards the transducer (the amount of energy reflected at each end of the cable is primarily related to the match or mismatch of electrical impedance.) When that reflected pulse again reaches the transducer, it acts as a second, smaller excitation pulse that follows the original pulse by a time interval equal to the round-trip electrical transit time in the cable.
In normal test setups with short cables, this reflected pulse arrives very quickly after the initial excitation pulse and it has no significant effect on transducer performance. However, as the electrical transit time through the cable approaches the resonant period of the transducer (1/frequency), the reflected pulse both extends the length of the excitation pulse and redrives the transducer. This additional ringing limits near-surface resolution, sometimes significantly. In the case of delay line transducers, the reflected pulse also redrives the delay line interface echo, again reducing near-surface resolution. With very long cables, a second excitation pulse will be observed, as well as duplicate backwall echoes separated by a time interval equal to the electrical length of the cable.
In some applications, the negative effects of cable reflections can be avoided by switching from single element transducers to dual element transducers. Because duals use separate transmitter and receiver elements and because dual setups normally look only at the first arriving echo from a target, increased excitation pulse and echo ringing are usually not a problem (although attenuation, delay, and noise pickup issues may remain).
In some cases cable reflections can be reduced by setting instrument damping to 50 ohms and coupling a 50 ohm terminator on the transducer end of the cable. However, this may have undesirable effects on echo shape, and in any case because all common NDT transducers have a complex electrical impedance profile, it is impossible to perfectly match electrical impedance with a pulser.
Cable Attenuation
Electrical resistance in long cables causes signal loss that increases with length. For this reason, in flaw detection setups where accurate tracking of echo amplitude is important, instrument sensitivity should always be calibrated with the actual cable being used for testing. Cable losses are usually small enough that they can be compensated by a simple adjustment of instrument gain. In extreme cases, using a preamplifier at the transducer end of the cable may be recommended.
Cable Delay
The electrical transit time through the transducer cable is part of the total distance or thickness measurement when using contact and dual element transducers (although not when measuring thickness in an echo-to-echo mode). Long cables can add significant time to a measurement and create errors if not zeroed out. For this reason, in any setup where thickness or distance measurement is based on timing the first backwall echo from the test piece, instrument zero calibration should always be performed with the actual cable being used for testing. This is usually a simple problem to solve as long as the proper calibration procedure is followed.
Cable Noise Pickup
Less common than the three conditions listed above, pickup of environmental RF noise through long cables can be a problem in applications that combine very long cables, high gain, and electrically noisy environments like proximity to motors or welders. In such cases, the cable noise can potentially mask echoes of interest. Possible solutions include using double-shielded coaxial cables, remote preamplifiers at the transducer end of the cable, and low-pass receiver filtering to filter out high-frequency noise components.
Cable Effects in Ultrasonic Testing—An Example
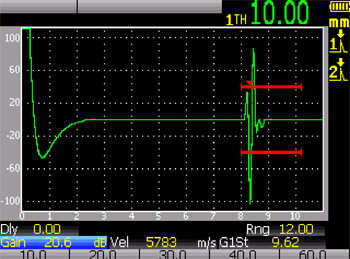
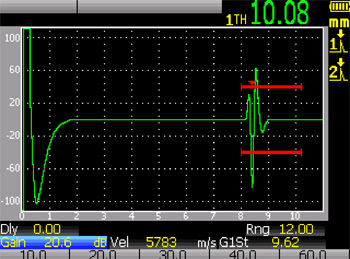
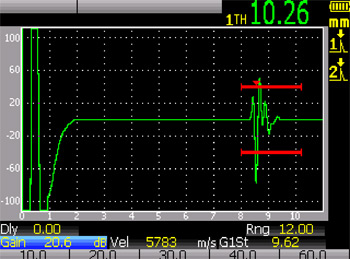
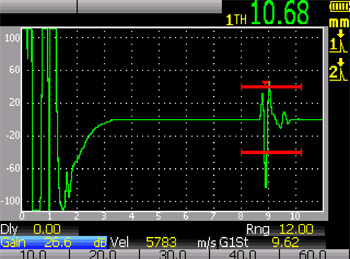
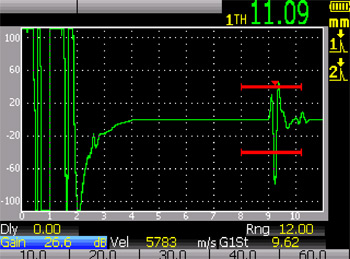
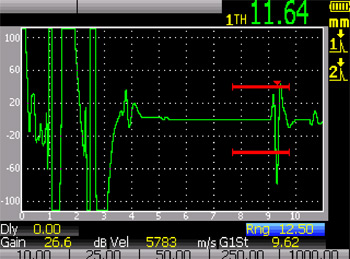
The following series of waveforms shows the effects of increasing cable length in a simple flaw detector setup that uses a 10 MHz broadband contact transducer to measure the thickness of a 10 mm thick steel reference block. Cable length is increased from 1 meter (approximately 3 feet) to 60 meters (200 feet) in six steps. These waveforms are meant to show a generalized example of long cable effects. Specific results will differ as transducer frequency and bandwidth changes. At higher
frequencies the effects will be more pronounced, while at lower frequencies they will be less so.
1 meter (3-foot) cable |
4-meter (12-foot) cable. Excitation pulse appears slightly larger. Backwall echo is slightly wider. Thickness reading is offset by 0.26 mm. |
10-meter (30-foot) cable. Excitation pulse appears significantly larger. Backwall echo has developed an extra cycle. Thickness reading is offset by 0.26 mm. |
25-meter (80-foot) cable. Gain has been increased by 6 dB to compensate for cable loss. Excitation pulse rings significantly. Backwall echo is followed by cable reflection. Thickness reading is offset by 0.68 mm. |
40-meter (125-foot) cable. Further increase in excitation pulse ringing. Thickness reading is offset by 1.09 mm. |
60-meter (200-foot) cable. Excitation pulse and backwall echo are both doubled. Thickness reading is offset by 1.64 mm. |
