Particulate inspections of oil samples help to prevent corrosion and wear in plant equipment. The same methods can also be used for quality control inspection of oil and gas pipelines. Olympus’ CIX100 automated microscopy system provides an easy-to-use particulate inspection workflow that images and measures particles according to industry standards and in more detail than any other method for improved confidence in the quality of materials and liquids.
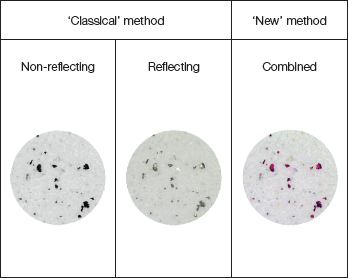
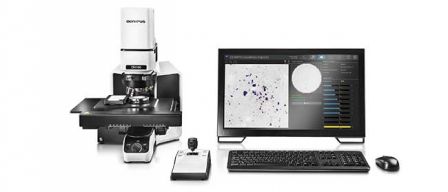
For a comprehensive overview of contamination in a sample of liquid, automated microscopic particle analysis is a suitable option. Automated particle analysis systems, such as Olympus’ CIX100 (figure 1), provide a fast, detailed and reliable way to obtain all the necessary information about contamination in a sample, and enable better decision making – both in manufacturing and in maintenance. The CIX100 inspection workflow is simple: a sample of liquid contaminated with particles is filtered through a filter membrane. The inspector can than place the filter membrane under the microscope and start the automated imaging and particle analysis. The microscope detects particles down to 5 μm – ten times smaller than stereo microscopy systems. Due to the microscope’s unique polarised light illumination, one single scan can detect both reflecting and non-reflecting particles in a single scan. This means that the imaging and analysis can be completed significantly faster than with conventional illumination (figure 2). Intuitive software then automatically summarises the results for easy, fast and customised report generation. Two application areas where microscope-based analysis provides significant benefits over alternative techniques are quality control (QC) in pipe manufacturing and inspection of oils used in industrial plants for hydraulic systems and lubrication. |  Figure 2: Olympus’ unique illumination approach polarises part of the light’s spectrum to detect reflecting particles, avoiding the need for a separate scan and speeding up inspections. |
Maintenance: Oil Inspection
Hydraulic systems, transformers and gearboxes all rely on oil for effective operation. However, both oxidation and friction can lead to the formation of particulates, which in turn can cause corrosion, reduced efficiency and part failure. Regular inspection of oil samples helps to prevent damage by knowing when to replace the oil (figure 3).
Using the CIX100 for imaging a filter membrane after sample filtration ensures that the most detailed sample information is extracted. The CIX100 shows the presence of potentially transparent contaminants, such as sludge and varnish, which are formed by oxidation of oil. The reliability of the detection ensures that inspections are fully compliant with relevant oil and gas industry standards (ISO4406, ISO4407, DIN51455 and SAE AS4059). Furthermore, automated thresholding settings for oil samples means that inspections are fast and do not require extensive training to perform.
Manufacturing: Pipeline QC
Summary
Microscopes have come a long way since the days of manual particle counts to quantify contamination. Modern automated microscopy systems can identify and measure particles with unrivalled precision, enabling inspectors to retrieve reliable information that cannot be identified using laser-based particle counters.
In the oil and gas and power generation industry, Olympus’ automated CIX100 microscope can be used in manufacturing and maintenance to detect a wide range of particles. The simple, intuitive workflow means that data acquisition, reviewing and reporting is fast and straightforward, enabling inspectors to maximize precision while keeping their inspections fast and efficient.


