Introduction:
Automated ultrasonic testing (AUT) with phased array zone discrimination is a common method used to inspect pipeline girth welds. AUT enables the accurate sizing of indications, with demonstrated height sizing precision of about 1 mm. Seamless pipes used in the field are known to have significant variations in wall thickness due to their manufacturing process. Inspecting those pipes with zone discrimination becomes a challenge because the variable geometry can cause the ultrasonic beam to completely miss its target. However, the Olympus PipeWIZARD offers a solution to this challenge that makes weld inspection less time consuming and more cost effective.
Challenges of seamless pipe inspection
Due to their variable wall thickness, inspecting seamless pipes with AUT can be a tedious process. When inspecting these pipes using AUT, the operator must program three different setups and scan three calibration blocks to cover nominal, minimum, and maximum thicknesses. This ensures that the inspection setup takes into account all possible variations in thicknesses of the pipe and that all beams are properly calibrated before acquiring data on the weld. Since this technique requires a separate scan of the weld for each setup, it adds significant time and cost because the number of calibration blocks, scans, and data files to analyze are multiplied by a factor of three.
Inspection solution with the PipeWIZARD
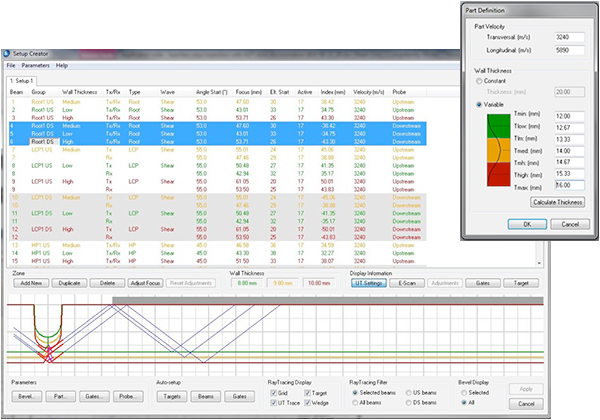
To make it easier to inspect pipes with variable thicknesses, the Olympus PipeWIZARD includes a software option that automatically generates additional ultrasonic beams to ensure full coverage of the weld in a single pass. Using the PipeWIZARD software, the operator inputs the minimum and maximum possible pipe thicknesses based on tolerances provided by manufacturer. The software uses the lowest and highest values to automatically build the three setups and assigns ultrasonic beams to cover the entire range. Only one block is used to perform the calibration. The beam parameters the software creates for the low and high thicknesses are based on the parameters that were assigned to the medium thickness setup at calibration. During the weld inspection, the system simultaneously acquires data with the three setups. To analyze the data, the operator chooses the appropriate view to display based on the wall thickness measurement of the pipe that was acquired by each phased array probe during the scan. The software makes understanding each setup easy by displaying a drawing of the weld with lines corresponding to each beam in the setup creator menu (Figure 1). Each configuration is color coded for easy viewing. Data for every thickness are recorded and easily selected in the software after a single scan of the calibration block or weld.

Summary of advantages of the PipeWIZARD wall thickness variation tool
The PipeWIZARD’s wall thickness variation tool enables operators to make accurate inspections of welds in seamless pipes. The advantages include:
- Increases on-site productivity since only one scan is required rather than three.
- The accurate inspection of girth welds in seamless pipes.
- Full coverage of all zones of the weld in a single pass.
- Precise height sizing of indications.
- Intuitive, easy to use software.
Conclusion
Inspecting welds with AUT zone discrimination and the PipeWIZARD system provide accurate measurement and positioning of indications. Utilizing the wall thickness variation tool for welds in seamless pipes ensures that welds are inspected with a high degree of precision. Most importantly, using the PipeWIZARD system requires only a single calibration block and limits the number of scans required to inspect a weld, saving time and money.

