From the creation of everyday products to the development of cutting-edge technologies, manufacturing plays a pivotal role in virtually every sector. Ensuring product quality and compliance is critical in this work, and part inspection helps maintain these high standards.
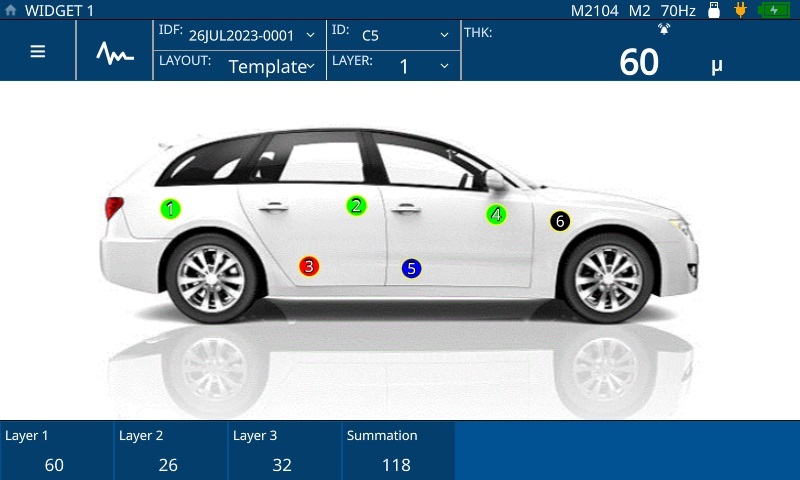
To streamline inspection processes and optimize quality control efforts, our engineers developed a new thickness gauging feature: an interactive custom template. Available on the 72DL PLUS™ ultrasonic thickness gauge, the interactive custom template shows clearly marked inspection locations on an image of a part, giving users a helpful visual tool for taking routine thickness measurements.
In this post, we explore how the interactive custom template supports manufacturing, from standardizing the thickness inspection process to improving quality control and facilitating data analysis.
Standardizing the Thickness Inspection Process in Manufacturing
The interactive custom template provides visual reference of the part being inspected with clearly marked inspection locations. Supervisors can use the 72DL PLUS PC interface application to create a template in several simple steps:
- Upload the part image
- Mark the specific locations to inspect
- Add custom names for the inspection locations (optional)
- Select colors to indicate the status and quality of the thickness measurement
Once the custom template is created, the supervisor can then seamlessly send the template to one or more 72DL PLUS gauges on the production floor. This standardization across multiple devices eliminates ambiguity, so all inspectors can follow the same process and evaluate parts consistently, regardless of location or shift.
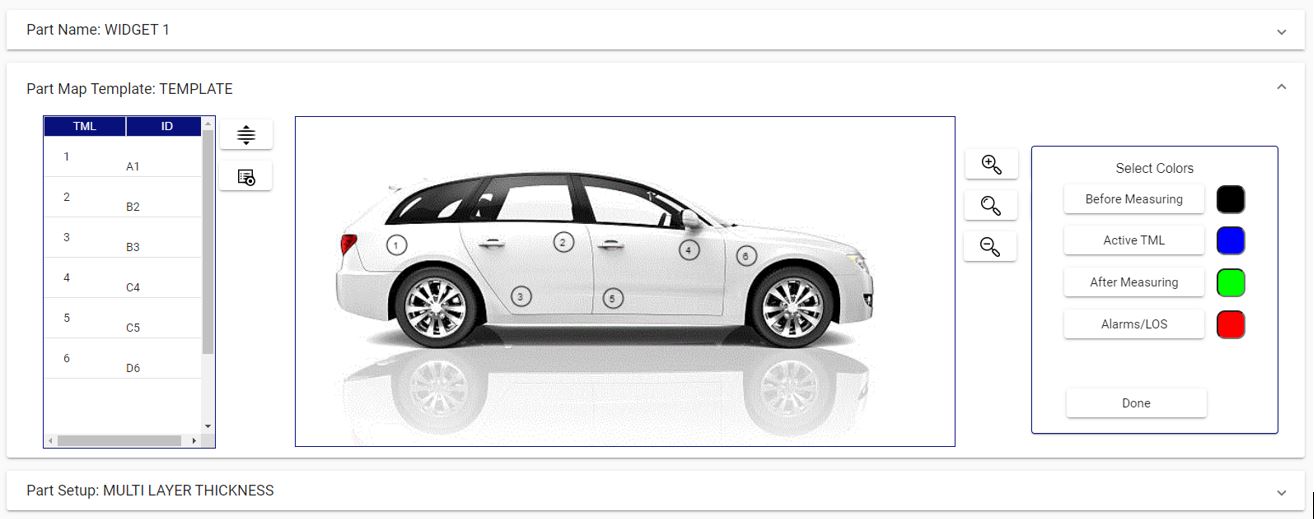
Part creation workflow on the 72DL PLUS PC interface application, enabling supervisors to add thickness measurement locations (TMLs) on the uploaded part image and select colors to indicate the status of the TMLs.
Efficiency and Accuracy in the Thickness Inspection Process
When the inspector recalls the part setup on the 72DL PLUS gauge, the instrument displays an image of the part to be inspected with clearly marked inspection locations. The inspector can use the touchscreen to zoom and pan the template to confirm they are inspecting the right location on the part.
The interactive nature of the custom template provides real-time feedback during inspections. As measurements are captured, the gauge updates the template with colors corresponding to the status of the thickness measurement location (TML), giving inspectors immediate visual feedback. This interactive feature enables inspectors to quickly identify potential thickness variations or defects, reducing inspection time so that the issues can be promptly corrected.
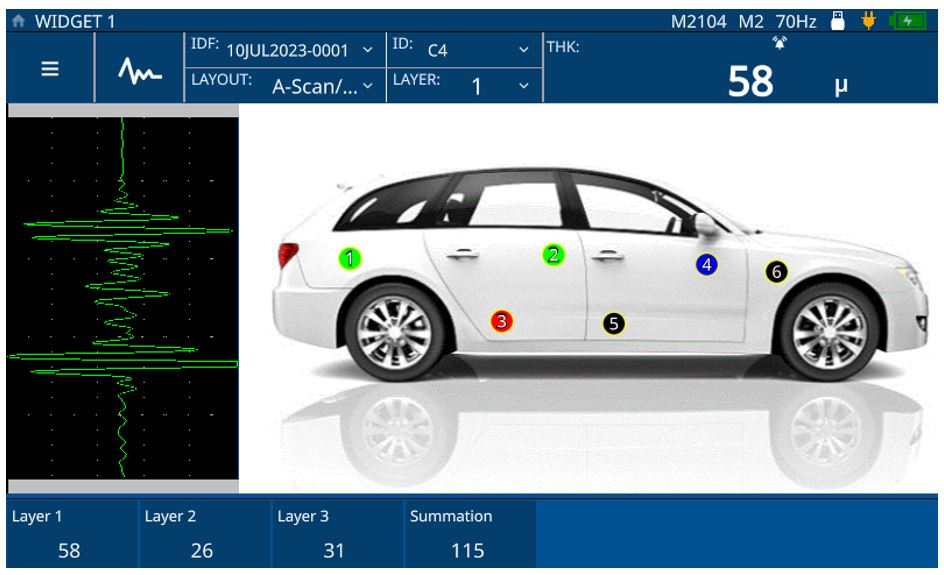
Interactive custom template on the 72DL PLUS gauge showing the part image of a car. The TMLs in corresponding colors provide real-time feedback for the inspector on the production floor.
Training and Support for Thickness Inspections
The interactive custom template is also beneficial for training new inspectors, as the template provides clarity on the specific locations that need to be inspected. In the inspection data file (IDF), supervisors and inspectors alike can easily review the measurements, A-scan, alarm conditions, and other information for each TML, including its inspection status on the template.
This data can be reviewed either directly on the 72DL PLUS gauge or through the PC interface application. This setup promotes consistent inspection practices and makes it easy for new inspectors to adhere to the established inspection standards.
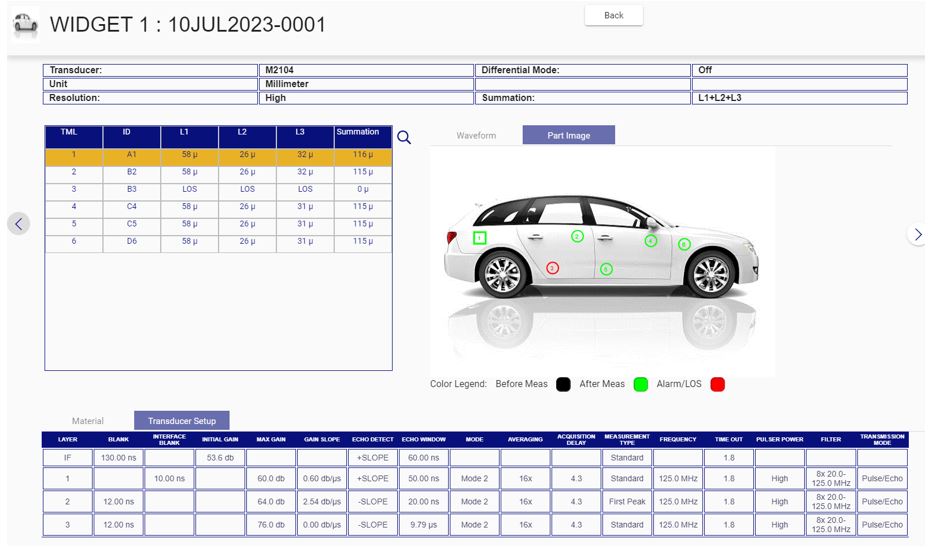
Review inspection data files on the PC interface application with measurements for each TML and the option to switch between waveform view and part map view.
Facilitating Data Management and Analysis for Thickness Inspections
The interactive custom template also assists with data management and analysis. Measurement data can be easily recorded and associated with specific locations on the template. Inspection data files transferred to the PC interface application can be reviewed by data analysts. They can study the thickness trends of each TML of a part and use this information for quality control documentation, process improvement, and compliance purposes.
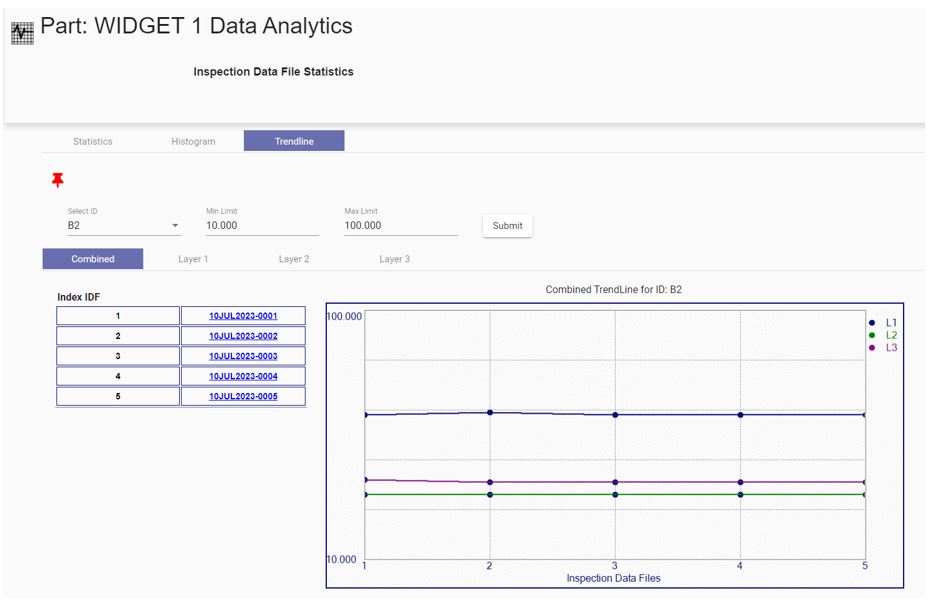
The 72DL PLUS PC interface application shows a thickness trend of a TML for a part with multilayer measurements.
Empowering Data-Driven Decision-Making in Manufacturing
The report builder in the 72DL PLUS PC interface application empowers data analysts to generate reports for stakeholders with a range of inspection data:
- Part setup information
- Inspection data files
- Statistics
- Thickness trends
- Part image with the TMLs
These thorough reports support data-driven decision-making, enabling stakeholders to make informed choices based on reliable and comprehensive data.
By standardizing inspections, enhancing efficiency and accuracy, improving training, and facilitating data analysis, the interactive custom template empowers manufacturers to optimize quality control efforts. We look forward to seeing the continued advancements and impact this feature brings to the manufacturing industry. For any questions or to learn more about how the interactive custom template can fit into your quality control process, simply contact us.
Related Content
8 Reasons to Try the 72DL PLUS™ Ultrasonic Thickness Gauge
Measure 6 Layers of Automotive Paint with One Thickness Test
