8.4 API
API 5UE
The American Petroleum Institute Recommended Practice 5UE is used to inspect newly fabricated steel pipe for ID cracking. The API code describes two crack sizing methods for characterization of ID cracking: the Amplitude Comparison Technique (ACT) and the Amplitude-Distance Differential Technique (ADDT). Software has been developed to perform the calculations used in the ADDT sizing technique.
The test is based on the following equation:
di = Amax × (T2-T1) × k
where:
di = imperfection size
Amax = Maximum amplitude returned from defect area (usually 80%)
t1 = 6dB drop point from leading peak of Amax (distance or time)
t2 = 6dB drop point from trailing peak of Amax (distance or time)
k = A constant calculated from calibration to a reference notch
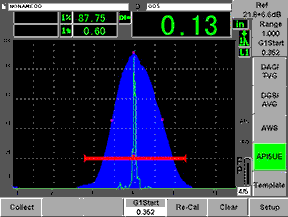
In ADDT testing, when a crack has been located during angle beam testing, the operator finds the peak amplitude point and sets it to 80% screen height. This indication is designated as Amax. The probe is then moved towards the crack until the signal has dropped by 6 dB or 50%, and this position is noted as T1. It is then backed away from the crack to point on the other side of the echo envelope where the signal has dropped by 50%, and this position is designated as T2.
In a typical software implementation, the operator simply scans the probe across the indication while recording an echo envelope. The k constant is established in an initial reference calibration on a notch of known size. Software then identifies the Amax peak and the T1 and T2 points for each collected indication (marked with red dots on the edges of the envelope below) and calculates the “di” value, 0.13” in the example below.
