相控阵技术规格
Because of the multi-element nature of phased array instruments, there are additional key specifications that need further consideration and review.
Number of Pulsers: Will define the maximum number of elements that can be grouped to form an active aperture or virtual probe aperture.
Number of Receivers: Will define the total number of elements that can be used for sequencing apertures that leads to the potential increase in coverage from a single probe footprint.
XX:YY: Naming convention used where XX = Number of pulsers and YY= Number of receiver paths. The number of receivers is always greater or equal to number of pulsers. Instruments from 16:16 to 32:128 are available in field portable packaging. Higher pulser and receiver combinations are available for in-line inspection and/or systems that use larger element count probes.
Focal Laws: The number of focal laws that can be combined to form an image is often specified. In general, higher XX:YY configurations can support more focal laws as they support greater element apertures and/or more aperture stepping in linear scanning. Note that more focal laws does not always mean more functionality. Take the example below using a 64 element probe performing a sectorial scan of three side-drilled holes from 40 to 70 degrees, comparing steering with 1 degree
(30 laws), 2 degree (15 laws), and 4 degree (7 laws) steps over a 2 inch, 50 mm metal path. While the image will be slightly better defined with finer angle increments, detection at coarser resolution is adequate. Unless beam diameter is drastically reduced with focusing, sizing from images will not dramatically change either.
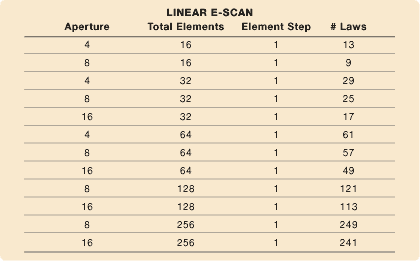
Examples for the number of focal laws required performing linear scans with varying combinations of virtual probe apertures and total element counts are shown below.

From the above, it is readily apparent that a 16:16 configuration used with a 16 element transducers may only require 30 laws while a 16:128 or 32:128 instrument configuration used in linear scan mode with a 128 element transducer may very well require 128 focal laws.
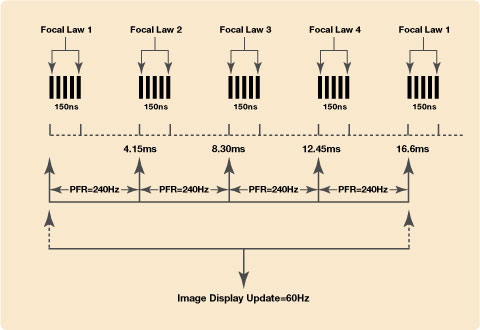
PRF/Display Update Rate: Instruments can vary greatly in display update in various image modes. For phased array imaging modes:
![]()
An example of a reduced four focal law linear scan sequence with a 60 Hz image display update is shown below for conceptualization.

The actual image display rate may be affected by other parameters. The A-scan refresh rate of a single focal law will vary between instruments. In some instruments, the A-scan PRF rate is limited by the maximum image display update, whether it is shown with the phased array image or even when maximized to a full A-scan. For this reason, in some applications it may be important to verify A-scan PRF when derived from focal law sequence in various image display modes.
Probe recognition: The ability to recognize phased array probes reduces operator setup time by automatically configuring an instrument setup with proper number of elements and probe geometry.
Image types: Sectorial and linear scans are typically available in phased array instruments. The ability to stack these image modes to create amplitude and depth C-scans allows planar images to be formed and provides expanded means for sizing defects.
Waveform storage: The ability to store raw RF waveforms allows data to be reviewed off line. This is particularly useful when collecting data over a large area.
Multi-Group support: More capable phased array instruments allow multiple focal law groups to be sequenced on one or more connected transducers. This is especially useful in cases where it is important to collect volumetric data which will be analyzed off line. For example, a 5 MHz, 64 element probe can be programmed to use elements 1-16 for a 40 to 70 degree sector scan, while a second group can be used to perform a 60 degree linear scan with an aperture of 16 elements,
stepping by one element over the entire 64 element length.
Encoding: There are two classes of instruments generally available: manual and encoded.
A manual phased array instrument works much like a conventional flaw detector as it provides real time data. Along with an A-scan, the instrument also shows real time S-scan or linear scan images which can aid in detection and discontinuity analysis. The ability to use and visualize more than one angle at a time in a test would be the main reason for using this type of instrument. In some cases like crack sizing, the image can be used as a tool to help size crack depth.
A phased instrument with encoder interface merges probe positional data, probe geometry, and programmed focal law sequences to allow top, end and side view images of test specimen. In instruments that also store full waveform data, images can be reconstructed to provide cross sectional views along the length of the scan or regenerate planar C-scans at various levels. These encoded images allow for planar sizing of defects.
Reference Cursors: Instruments will provide various cursors that can be used on an image for direct sizing. In a sectorial scan, it is possible to use cursors for measurement of crack height. Approximate defect size can be measured in encoded linear C-scans as well.
Continue on to
Calibration and Normalization >>